Saab Link Forums banner

New to the C900 crowd

6.1K views 41 replies 14 participants last post by  CycM17  
#1 ·
I've been on the prowl for a while looking for a C900 convertible. I posted a wanted ad a while ago and Adam (VI009DZ) got in touch with me letting me know he had one in the process of being buttoned back up from a transmission replacement.

Anywayyy, long story short, it's in my garage now! It's Commemorative Edition #437 with 103k miles on it. I have put about 300 miles on it so far and really love the thing. I can't wait to tinker with it and iron out the rest of the small issues. Not that there are many.

Big thanks to Adam for all his help and the work he's put into it over the last month!! Very excited to have this car in the family now with my 9-5 Aero!

Image


Image


Image
 
#5 ·
Wow, awesome! Very nice. (Though you should really button up that door card :winky:.)

:th_MySaab900Like:
I've had it for 24 hours! Haha. Had to wash off all the Vermont mud and salt before doing anything. I have to find some cool fabric to put on them...

Awesome. Must see!
Yeah definitely!! A c900 meetup is in order soon.
 
#9 ·
You can cut new ones from 1/4" Masonite from Home Depot. I've done that on a couple cars when I wanted to save the originals but wanted to try a different color fabric.

On the padding; I get some headliner fabric (cloth with foam backing) and glue it on the card fabric-side-down first. Then apply your new fabric over the top of that. If you don't pad them first, you will see the metal banding at the top and bottom and the holes where the clips go, through the fabric.

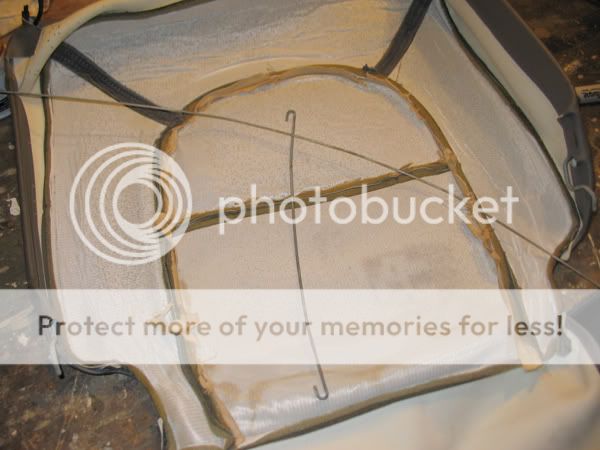
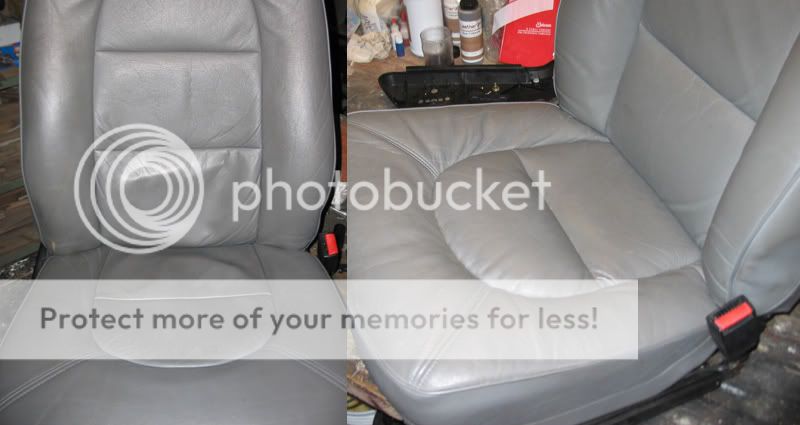
Looks like your seats need the tufting wires fixed too--you have flat-seat syndrome. You can hand stitch the wires back on directly to the excess leather at the seams.

Image


Image


Before/after:
Image
 
#23 ·
So I attemped this the other night, and after passing the needle through the leather twice, I discovered that it would take 3 days short of forever to accomplish this feat. Pushing a needle through the leather is damn near impossible.

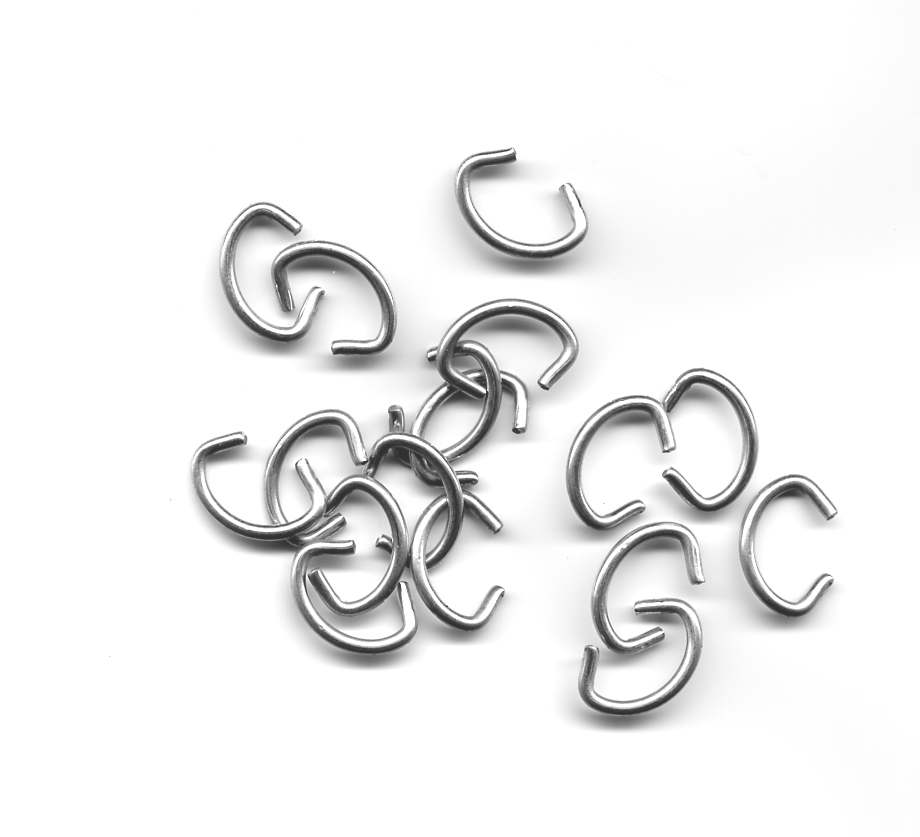
I improvised, and decided to use hog rings. Went on eBay and bough 150 hog rings for $5.29 shipped to my door.

Image


For passing them through the leather, I needed a hole punch. To accomplsh that, I took a Romex staple for doing electrical work, and held it in a vise grip. A steady push/twist through both protruding pieces of leather quickly makes a 1/8" hole; literally 1-2 seconds. Remove staple, put hog ring through the newly punched hole.

Image


I put hog rings about 1" apart, the entire way around all of the metal bands on both the seat back, and seat bottom. Once they were slid in place, I laid the band down, and crimped the hog rings shut. A pair of hog ring pliers can be used, but I just used the vise grip, and it worked fine.

I did both the upper and lower seat covers during the second half of the Wichita / VCU game last night; about 1hr. Worked S L I C K.
 
#11 ·
I think it corresponds with GM's involvement.*

Not sure why really, I know that the sleeves that the wires go in literally disintegrate. They are really flimsy thin fabric. Not a heavy canvass or synthetic like you'd expect. Once they tear, the seams also become loose and the thread starts letting go.
 
#13 ·
I used a heavy nylon upholstery thread and a big-ass curved needle. First I restitched the seat seams where they were separating a little bit. I hand-stitched through the original holes. Then I stitched the wires back on directly to the excess leather at the seams. I knotted it about every 3/4". You have to wear a decent pair of work gloves and you need a spoon or something to push the needle through the leather or your hands will get brutalized. I leave what's left of the original sleeves in place. If you remove it, the seams open up. I've done it this way to at least 4 sets of seats over the years, upper and lower. Usually just sit with a couple beers and do it while watching a ball game or something.

I've got more time than money. If your situation is reversed, any upholstery shop can sew in new sleeves and restitch the seams for a price.
 
#15 ·
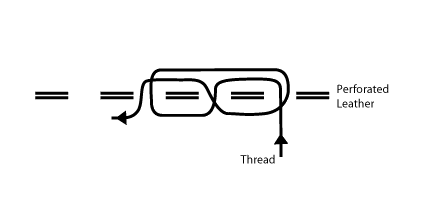
BTW, if you have to restitch split seams, you can't just snake your way along-- up one hole, down the next, up the next, etc. You have to do a locking stitch or the seam will get puckered and wavy. Here's what I did--again, using holes made when it was originally machine sewn.

Image
 
#21 ·
One thing you want to do with a convertible in the winter is lower the top and clean any salt off the front bow periodically. The front bow is aluminum and if salt is allowed to penetrate there the bow corrodes and rains aluminum flakes on you every time you open the top. Also a good idea to tighten the catch hooks so the top closes very snugly. You can loosen them back up in the summer.

I have no problem with the heat in my vert over winter. The heated seats, rear defroster, and heated mirrors all work, and the cabin heater will drive you out of the car if you keep it on more than a third of the way. Only difference I see is that the cabin fills with air like a balloon. The top expands and the window seams whistle a bit as that air is trying to escape. :)
 
#22 ·
Only difference I see is that the cabin fills with air like a balloon. The top expands and the window seams whistle a bit as that air is trying to escape. :)
I always thought that was the low pressure area around the moving car, exploiting the flex in fabric.

When washing mine, I have to be careful not to spray water directly at the top of the door windows. A little will end up in the roof frame and when I make the first turn, the forecast calls for light rain. :)

Same with the rear window... at the correct angle, water can get in the under the sides of the rear glass where the canvas has a couple inches of overlap and pool up on the vinyl cover between the staples and rear headrests.
 
#24 ·
Haha. Yeah, that's why I always suggest a good pair of work gloves and something to push the needle through. You also need a big-ass arched needle to do it. I did do one set of skins a while ago using a leather punch and small zip ties. Then I started doing it with stitching. I think the only way to avoid the brutal and tedious task is to pay an upholsterer to do it with a machine. :)
 
#25 ·
So I guess now that I'm two years into owning this car I'm due for an update. I had a rocky start with this car but I think most of the wrinkles are ironed out now and I'm starting to feel better about spending money on goodies rather than repairs.

After inquiring about some SE rear extension panels RadioFlyer had for sale, he suckered me into buying the rest of the SPG kit as well. After 3-4 weeks of *leisurely* installing the panels in my free time after work and on weekends it's finally all buttoned up. Install was VERY easy for me; they all just slid right onto the rails. I found no rust whatsoever under any of the factory bumper extensions or rubber trim pieces, which made me happy. Also got a glimpse of the original Nova Black paint job under all the old rubber moldings and extension pieces. At least I now know where we can match paint to someday when I'm rich and famous and can restore it back to its CE color.

I have a case of matching paint and prep supplies for the bumpers; just need to find the time and motivation to paint them.

And thank you to Sam for a nice easy transaction!

017fa29c2018583a65a1141272cf6e0ffd8551bd43 by raquettelaker3, on Flickr

01832670bb533d4737e64505b6fe45371c45ed2106 by raquettelaker3, on Flickr

01ff3c947bec558985d75261ec79f8da12cd77a7ad by raquettelaker3, on Flickr

01113ae720d3e133750dc0e873b0ee0c2ba56a2c03 by raquettelaker3, on Flickr
 
#26 · (Edited)
Now that's a Saab!!!!

Very very very nice!!! Love the wheels!!! :winky:

Are your panels black??

I see your a man with a similar palette as myself; like em lean and clean!


Awesome job mate!!! Not too many this nice this side the pond. You could ask $10,000 for that car and not blink


Seems you got lazy like I did and haven't gotten around to painting the back bumper yet

With the top down on these cars you can't tell if its. 1993, 2003, or 2013, the line are timeless..
 
#27 · (Edited)
Now that's a Saab!!!!

Very very very nice!!! Love the wheels!!! :winky:

Are your panels black??

I see your a man with a similar palette as myself; like em lean and clean!

Awesome job mate!!! Not too many this nice this side the pond. You could ask $10,000 for that car and not blink

Seems you got lazy like I did and haven't gotten around to painting the back bumper yet

With the top down on these cars you can't tell if its. 1993, 2003, or 2013, the line are timeless..
Thanks! (And yes, when I had tires put on last month they messed up the directionality of the wheels; need to find time to go back and have them correct that).

I was told the panels are painted Dupli-Color "Dark Charcoal," which is darker than OEM but not quite black. I haven't painted either of the bumpers, though I have a case of the paint waiting.

Not sure about $10k just yet, haha. Maybe once the seats are re-stitched and the car has had a proper paint job. I did just switch to a stated value insurance policy of an optimistic $8k though. Ain't nobody got time for that bullshit $2400 blue book value.
 
#29 ·
Capture by raquettelaker3, on Flickr

I keep a folder on my computer with screenshots of other CE's listed for sale between $9,000-11,500 should the day ever come that I need to prove its value to my insurance company.