Saab Link Forums banner

Custom Fiberglass Gauge Pod (Post/Pillar)

17K views 72 replies 12 participants last post by  WarGames  
#1 ·
Hi all, I've been taking a composites class for almost 10 weeks now, took a while to decide what I wanted to do for a project but I decided to make a custom gauge pod for fun and to save some money instead of getting the ones sold one genuinesaab.com.

Pillar Gauge Pod First Self Fitting Prototype:


Image


Here is a video of the first self fitting prototype just finished tonight with a water temp gauge (sender signal not connected yet) in the night.
Video (Night)

Let me know what you think and let me know if you are interested.
 
#3 ·
Cool!

I may be interested in a dual gauge holder for 52mm (2 1/16" ) gauges. How much would the single be?

Agree that the angle would need to be more inline with the driver.
 
#6 ·
Cool!

I may be interested in a dual gauge holder for 52mm (2 1/16" ) gauges. How much would the single be?

Agree that the angle would need to be more inline with the driver.
Yeah this is just a prototype, didn't quite get the angle right yet, underestimated the slope of the pillar. Also changing the angle will make more room for dual gauges, I plan on making a dual gauge pod once the single is perfected.

I'm not sure about a price yet, materials are fairly inexpensive but I do not have molds made yet so if anyone wanted something relatively soon it would require a few hours of work. Once I get a mold going the time required to build the gauge pod will be significantly reduced and the quality and strength will be better.

I can fabricate the gauge pods quickly without a mold and they will slide onto the post without the need for screws/bolts however they won't look perfect (they would look similar to the picture in the first post). This way people can get a functional product that is cheap (let's say $25-$30) and still have it look nice if they are willing to put in the time to sand/finish and paint the product.

I will post in the next couple weeks when I get the mold ready and functional and come up with an estimate for a final finished product.


Thanks for all the feedback and interest. Is anybody interested in trying this on their own? If so I may consider a tutorial or write up describing the process.
 
#9 ·
Gauge Pods Now Available For Sale (limited supply!)

Cool!

I may be interested in a dual gauge holder for 52mm (2 1/16" ) gauges. How much would the single be?

Agree that the angle would need to be more inline with the driver.
I have gotten the prototypes figured out pretty well by this point and will require very little effort/skill to buff and paint.

I can sell them either completely buffed and finished and will slide on with minimal effort or unbuffed with classic fiberglass/composite appearance for less.

At this point each part takes approximately 5-8 hours of "work" including drying times etc. so more like 3-4 hours of actual labor. So I cannot sell these quite as cheap as I'd at this time (price should go down if/when I make a mold for multiple productions).

Single Gauge Pod:
Price Unbuffed/Finished But Visually Acceptable (Easily Slides On): $35
Price Buffed/Finished/Smooth (Easily Slides On): $55


Dual Gauge Pod:
Price Unbuffed/Finished But Visually Acceptable (Easily Slides On): $60
Price Buffed/Finished/Smooth (Easily Slides On): $85


PRICES ARE NEGOTIABLE!! LIMITED SUPPLY!! PM ME OR EMAIL FOR INQUIRIES.
 
#10 ·
I'm interested, but can you post some pictures of the pods. Preferably in a well-lit environment. I'm trying to get an idea for routing wires.
 
#11 ·
Yeah definitely. I'll make one up just for you and take some pics for you ;)
I will prob start with a single gauge as the double gauge can take a lot of time. Thanks for your interest :)

The easiest method of routing wires in my opinion is to drill a small hole in the removable post and route the wires through there down into the dash.

I haven't figured out the best place to get power from yet but I am using a 3-way adapter with one opening plugged which is routed through the firewall and then into the dash. I haven't taken apart the dash yet to get the sender/signal wire through for the coolant temp gauge and find a suitable connection for ignition on power, for the meantime i have been using the cigarette lighter for my power:

Image


I was planning on routing the wires through the main wiring opening in the firewall but i was unable to take this piece off even with the hex screws removed:
Image
 
#14 ·
How is it scary? battery's disconnected drill was for drilling a hole through the firewall, adjustable wrenches were handy so i didn't have to keep switching wrenches to install all the bolts on the 3 port adapter
 
#18 ·
Corin, nice work on the gauge pod, if you're around tomorrow, I'm finally caught up and have some free time, I'd like to swing by and see the new gauge pod. How did the class go btw?
 
#22 ·
Nice project! What composites class is it for? RIT right?

...and don't listen to Brad. TCS isn't bad :)
Yeah the class was Composite Materials, Design, and Testing (0610.598.01) at RIT. Just finished after 10 weeks on the quarter system. The teacher was great and the labs were awesome. Thanks for the interest :)

Ha yea I don't use TCS much in Rochester (I have a manual on/off switch so its not evil to me) we just got a lot of snow tho and the TCS can be nice at 35-45mph with a couple inches of snow on the road with winter tires that are in there 3rd or 4th year of wear :p. Just don't step on the gas tho or you will be jerking hard :p.
 
#24 ·
Carbon Fiber, or other Composites ?

Would anybody prefer to have carbon fiber or another stronger composite? Also I can make plans to heat vacuum bag for even stronger and smoother appearance. This process will take a while and would probably cost more for materials and time for products/ prototype samples.

Just an idea if anyone is interested.
 
#37 ·
Is the switch so the gauges have switched power or just so you can turn them on and off?

Where were you thinking of installing the oil psi sensor? No need to drain the oil if you use one of the spots on the back of the engine block near the starter :)
 
#38 ·
Hey guys can't talk much, my gf has got me doing a bunch of cleaning with her tonight.

Where exactly are you talking about could you post a pick? There is a bolt on the right side of the engine (looking at it from the front) that looks like the adapter/sender could fit. Heres a pic of the sender:

Image


Ill post more soon just gotta do this stuff tonight sorry!!
 
#40 ·
It'll be easier for you to replace the factory oil pressure trigger with that sender. All you'll need is an M14x1.5 to 1/8NPT adapter. Follow the yellow wire off the back of the block to find where it is at. Easy swap out and keeps wiring shorter.
 
#41 ·
It is okay to use the same sender for the comp oil pressure and the gauge oil pressure? I was told I should always keep them separate bc the computer equipment is current sensitive?

Thanks a bunch for the tip, I'll take a look when I get a minute.

maybe I can install a 3 port adapter and plug one of the ends and have the factory pressure trigger on one end and the aftermarket sender? (like i did with the coolant temp sender).
 
#42 ·
What? Maybe I'm not following you here. I thought from your picture you just had one sender.

The factory sender just grounds the light bulb circuit in the dash to make it light up. You don't need it. Just put in your oil pressure sender for the gauge in place of the factory sender.
 
#43 ·
^ I agree.

If you look under the intake manifold, you'll see the sender with 1 wire coming from it.
 
#49 ·
Mcrowley is right, there are two tapped holes on the back of the B2X4 block. There is one directly behind the starter, and one in the center of the block. I THINK in the 9000 the one in the center is where the factory oil sender is. The one behind the starter is plugged.

In the B2X5 blocks the center hole is gone, and the factory sender is behind the starter. When I put the b234 in the 9-5, I originally planned on using the center hole (factory 9000 sender location) for the oil press sender. I could not though because of the fancy catch can that gets bolted onto the back of the block in the 9-5.

I ended up putting the sender in the factory 9-5 location, behind the starter, and plugging the center port. To install it, I had to remove the starter, but my aftermarket sender did fit (I was concerned). It was way easier on a lift.

Also, I found an oil press gauge in oreily that has two outputs, one for the gauge, and one for the factory idiot light. Pretty cool.
 
#50 ·
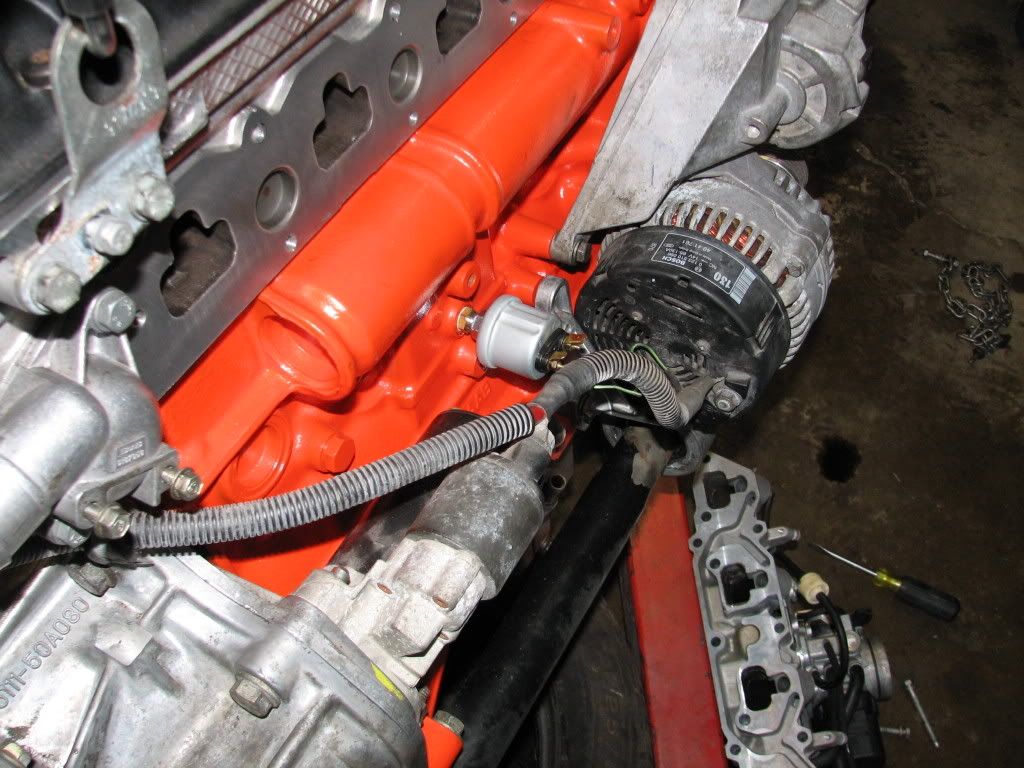
OK I found a pic of my engine build:

Image


You see the sender in the stock 9000 position. It didn't work for me because of the 9-5 oil catch can. I had to move it to the left, you can see the bolted plug that is stock on the 9K. I removed that, put it int he center hole.

You can see the room there is between the block and the starter. You can probably get at this from the top, but in the pic the 9-5 intake is not on so it lookes like it would be easy. In reality I found it easier to get at it from the bottom with the starter out.
 
#60 ·
OK I found a pic of my engine build:
Image


You see the sender in the stock 9000 position. It didn't work for me because of the 9-5 oil catch can. I had to move it to the left, you can see the bolted plug that is stock on the 9K. I removed that, put it int he center hole.

You can see the room there is between the block and the starter. You can probably get at this from the top, but in the pic the 9-5 intake is not on so it lookes like it would be easy. In reality I found it easier to get at it from the bottom with the starter out.
Aw man this looks tricky especially with the restricted space. Definitely looks doable tho. Could you possibly get a pic from the bottom? I think I may use a multi-port adapter as I did with the coolant temp sender.

I would like to have the factory sender as well just bc I will be switching gauges periodically and don't want to have to rely just on a manual oil pressure gauge.

Question for everyone, what is the minimum gauge for oil/temp sensor wires and/or what are the peaks in the current for the signals.

And also, what is the recommended gauge wire? 18 or 24awg and insulate with tape or tube is what I am seeing a lot, but I am only finding one small hole about 2-3mm in diameter (size of vacuum nipple basically) and am thinking at least for getting mutiple wires through I am going to have to increase the gauge (use smaller wires) at least at the main firewall protecting the cabin as there is no possible way to drill through that actual firewall with the tools I have. If It deems necessary I can find the tools though.